There’s an undeniable magic in stepping into your backyard and seeing a pristine, brand-new container swimming pool shimmering under the sun. It’s more than just a pool; it’s your private oasis, a centerpiece for family fun, and a testament to modern, sustainable style. These pools are the ultimate win: engineered from tough Corten steel, they’re incredibly durable, eco-friendly by design, and undeniably cool. My neighbor got one last summer, and our entire street was buzzing with envy until we were all invited over for a barbecue. Now, it’s the go-to spot for every neighborhood get-together.
This guide is your complete walkthrough for transforming that empty steel box into a sparkling sanctuary. We’ll cover everything from the crucial prep work to filling it perfectly and mastering the water chemistry. Let’s get your container swimming pool ready so you can dive in without a single worry.
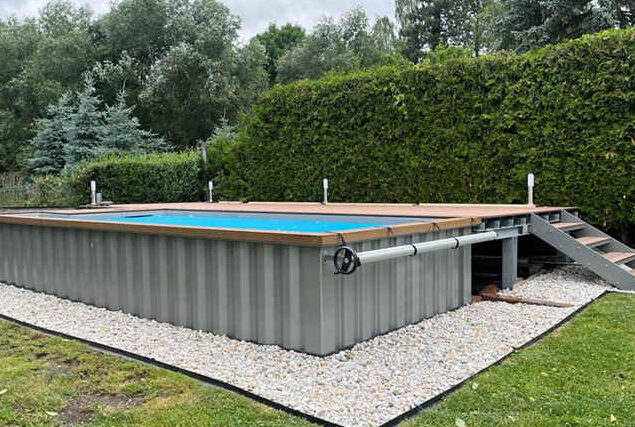
Part 1: The Pre-Fill Checklist for Your Container Swimming Pool
Before a single drop of water enters your pool, a little preparation goes a long way. This initial phase is crucial for ensuring safety, compliance, and a smooth setup process. Rushing this step can lead to headaches with local authorities or a less-than-perfect pool experience.
Understanding Local Regulations and Permits
The very first thing on your to-do list is to check with your local council or municipality regarding regulations for swimming pools. Don’t skip this! Some common requirements include:
- Fencing: Most regions have strict laws about pool fencing to prevent accidental drowning. This often specifies a minimum height (e.g., 4-5 feet), self-closing and self-latching gates, and specific spacing for pickets.
- Permits: Depending on the size and permanence of your container swimming pool, you may need a building or installation permit. This ensures the setup meets safety and construction codes.
- Setbacks: There are often rules about how far your pool must be from property lines, your house, and other structures.
- Signage: Some areas require specific safety signs, like “No Diving” or CPR instructions, to be visibly posted.
Dealing with bureaucracy can feel like a hassle, but sorting this out now is far better than facing fines or being forced to make changes later. A quick call or visit to your local planning department’s website will give you all the information you need. For U.S. residents, a great starting point is the International Code Council (ICC) website, which outlines many standard building codes.
Preparing the Pool Interior
Once your container swimming pool is delivered and placed on its foundation, take a moment to inspect and prep the interior.
- Inspect the Liner: Carefully look over the entire PVC liner for any scuffs, tears, or damage that might have occurred during shipping. It’s much easier to address these issues while the pool is empty.
- Clean Out Debris: The container might have collected dust, leaves, or other small debris during transport. Use a soft-bristled broom or a leaf blower to gently clean the interior. Avoid using sharp or abrasive tools that could damage the liner. A final wipe-down with a soft, damp cloth will ensure it’s spotless.
Choosing Your Water Source: Hose vs. Water Tanker
Now for the exciting part: adding water! You have two primary options, each with its own pros and cons.
- Garden Hose: This is the most common and cost-effective method. It’s simple—just drop the hose in and turn on the tap. However, it requires patience. A 20-foot pool can take 10-15 hours to fill, depending on your water pressure.
- Water Tanker Service: If you want to swim today, a water delivery service is the way to go. A tanker can fill your pool in an hour or two. The downside is the cost, which can be several hundred dollars. Crucially, ensure the company provides clean, potable (drinking-quality) water. You don’t want to start your pool journey with a truckload of murky or chemically treated water.
| Water Source | Pros | Cons | Best For |
|---|---|---|---|
| Garden Hose | Inexpensive, readily available | Very slow, dependent on water pressure | Budget-conscious owners not in a rush |
| Water Tanker | Extremely fast (1-2 hours) | More expensive, requires vetting the company | Owners who want to start swimming immediately |
Part 2: The Big Fill: A Step-by-Step Guide
With the prep work done, you’re ready to fill ‘er up! This stage is straightforward, but a few key details will set you up for crystal-clear water from day one.
Identifying the Perfect Water Level
Look for the skimmer box—the rectangular opening on the side of your pool wall. Your goal is to fill the pool until the water level is about halfway up this opening. This is the sweet spot for a few reasons:
- It allows the skimmer to effectively pull leaves, pollen, and other surface debris off the water.
- If the water is too low, the skimmer can suck in air, which can damage your pump.
- If the water is too high, the skimmer door won’t be able to create the surface tension needed to draw in debris.
Don’t panic if you overfill it slightly. svoltex container swimming pools are intelligently designed with an overflow pipe that safely drains the excess water, preventing any spillage or flooding around your pool area.
How Much Water Does a Container Pool Hold?
Knowing your pool’s volume is essential for calculating chemical dosages later. Here are the typical capacities:
- 20-foot container swimming pool: Holds approximately 10,000 liters (about 2,640 gallons).
- 40-foot container swimming pool: Holds approximately 20,000 liters (about 5,280 gallons).
Initial Filtration is Non-Negotiable
Once the pool is full, your very next step—before adding any chemicals—is to turn on the filtration system. Let it run for at least 8-12 hours, or one full turnover cycle. This initial run is vital for clearing out any fine dust from the manufacturing process or sediment from the fill water. I learned this the hard way once; I skipped the initial filter run, and my water looked like a cloudy science experiment for days. Starting with physically clean water makes the chemical balancing process infinitely easier.
Emma’s Story (Sydney, Australia): From Nervous to Novice
Emma, a mom of two in Sydney, was thrilled when her 20-foot container swimming pool arrived last summer. “I was a bit nervous about the whole setup process, especially the filling,” she admits. “But I just hooked up the garden hose, grabbed a coffee, and watched it fill. It took a few hours, but it was so satisfying. I get distracted by the kids and accidentally let it run too long, but the overflow pipe saved me from a mini flood! Now, the pool is our absolute summer go-to. The kids live in it!”
Part 3: Demystifying Container Swimming Pool Water Chemistry
Okay, let’s talk about “water chemistry.” The term can sound intimidating, like you need a degree in biochemistry to manage it. But trust me, it’s far simpler than it sounds. Think of it as following a recipe. Once you understand the key ingredients and their roles, maintaining a healthy, balanced pool becomes a simple routine. When I first tackled it, I called a local pool technician who walked me through everything. It was the best investment I made.
Your Essential Water Chemistry Toolkit
Before you start adding chemicals, you need a way to measure what’s already in the water. Get yourself a good quality water testing kit. You have a few options:
- Test Strips: Quick, easy, and affordable. You dip a strip in the water, and colored pads change to indicate the levels of different chemicals. They’re great for daily or weekly checks.
- Liquid Reagent Kits: These are more accurate. You take a water sample and add specific drops of reagents, which change the water’s color. You then compare this color to a chart. They take a bit more time but provide more precise readings.
The Core Four: Understanding Key Chemical Levels
Your primary goal is to keep four main components in balance.
1. pH (Potential Hydrogen)
- What it is: A scale from 0 to 14 that measures how acidic or alkaline your water is. 7 is neutral.
- Ideal Range: 7.4 to 7.6. This is slightly alkaline, which is comfortable for your eyes and skin and helps chlorine work effectively.
- Why it matters:
- Low pH (Acidic): Can cause skin and eye irritation, corrode metal parts of your pool equipment, and even damage the pool liner over time.
- High pH (Alkaline): Reduces the effectiveness of your chlorine, leading to cloudy water and potential algae growth. It can also cause calcium scaling on your pool surfaces and equipment.
- How to Adjust:
- To lower pH, use a pH decreaser (like muriatic acid or sodium bisulfate).
- To raise pH, use a pH increaser (like soda ash).
2. Chlorine (Sanitizer)
- What it is: The primary sanitizer that kills bacteria, viruses, algae, and other harmful microorganisms.
- Ideal Range: 1.0 to 3.0 parts per million (ppm).
- Why it matters: This is your pool’s immune system. Without proper chlorine levels, your pool can quickly become a breeding ground for nasty contaminants, turning it green and unsafe for swimming.
- Smart Sanitizing: Many modern container swimming pools, like those from svoltex, use a saltwater chlorinator. This brilliant system uses a small amount of salt (like magnesium salt) in the water and converts it into pure chlorine through electrolysis. It provides a steady, consistent stream of sanitizer, so you don’t have to manually add chlorine pucks or liquid shock as often.
3. Total Alkalinity (TA)
- What it is: A measure of the dissolved alkaline substances in the water. Think of it as the “pH buffer.”
- Ideal Range: 80 to 120 ppm.
- Why it matters: Proper alkalinity prevents your pH from swinging wildly. If your TA is too low, your pH level will be very unstable and bounce up and down with every chemical addition or rainstorm. If it’s too high, your pH will be difficult to adjust.
- How to Adjust:
- To raise TA, use an alkalinity increaser (sodium bicarbonate, which is basically baking soda).
4. Calcium Hardness (CH)
- What it is: The measure of dissolved calcium in the water.
- Ideal Range: 200 to 400 ppm.
- Why it matters: Water naturally wants to find a balance. If it’s too “soft” (low calcium), it will try to pull calcium from its surroundings—which includes your pool liner and equipment, causing damage over time.
- How to Adjust:
- To raise CH, use a calcium hardness increaser (calcium chloride).
Secondary (But Important) Chemicals
- Cyanuric Acid (CYA): Often called “stabilizer” or “sunscreen for your chlorine.” It’s a chemical that protects chlorine from being broken down by the sun’s UV rays. Ideal range is 30-50 ppm.
- Phosphate and Metal Removers: Phosphates are food for algae, and metals (like iron or copper) can stain your pool liner. Occasionally adding specialty chemicals to remove these can be a great preventative measure.
For a deep dive into pool chemistry, the Pool & Hot Tub Alliance (PHTA) offers fantastic resources for homeowners.
Part 4: Your Weekly Maintenance Routine for a Sparkling Container Pool
Once your water is balanced, maintaining it is surprisingly easy. A little bit of consistent effort will keep your container swimming pool sparkling and ready for a swim at a moment’s notice. Dedicate about 30 minutes once a week to this simple routine. I keep a small notebook in my pool shed to log test results and chemical additions—it’s a lifesaver for staying organized.
Weekly Tasks (The 30-Minute Check-up)
- Test and Balance: Use your test kit to check the pH, chlorine, and alkalinity levels. Adjust as needed with the appropriate chemicals.
- Skim the Surface: Use a long-handled skimmer net to remove any leaves, bugs, or floating debris.
- Empty Baskets: Check and empty the skimmer basket and the pump’s strainer basket. Clogged baskets restrict water flow and make your filtration system work harder.
- Check Water Level: After a hot, dry week or a big party with lots of splashing, your water level might be low. Top it off with the hose to bring it back to the mid-skimmer level. After a heavy rain, you may need to drain some water.
- Visual Inspection: Take a quick look at your pump, filter, and heater (if you have one) to ensure everything is running smoothly and there are no leaks.
Bi-Weekly & Monthly Tasks
- Brush the Walls: Every week or two, use a pool brush to scrub the walls, steps, and corners. This prevents algae from getting a foothold and keeps the liner feeling smooth.
- Vacuum the Pool: Depending on how much debris falls into your pool, you’ll want to vacuum the floor every 1-4 weeks. You can do this manually or invest in an automatic or robotic pool cleaner to do the work for you.
- Clean the Filter: Over time, your filter will get clogged with the dirt it has removed. You’ll know it’s time to clean it when the pressure gauge on the filter reads 8-10 PSI above its normal “clean” pressure. For cartridge filters, this means removing and hosing down the cartridge. For sand filters, it involves a process called “backwashing.”
James’ Seattle Story: Beating the Rain
James from Seattle got his 40-foot container swimming pool in early 2025. “With all the rain we get in Seattle, I was nervous about keeping the water chemistry balanced,” he says. “But the system is so robust. I just follow the weekly checklist. The tech who helped with the initial setup nailed the balance, and now I just check it once a week. It’s always ready for a swim, rain or shine.”
Part 5: The svoltex Advantage: Why a Container Swimming Pool is the Smart Choice
You’re not just buying a pool; you’re investing in a lifestyle. Container swimming pools are a superior choice for the modern homeowner for several reasons.
- Unmatched Durability: Shipping containers are built from Corten steel, designed to withstand years of harsh ocean voyages. They are incredibly strong, long-lasting, and can handle anything you throw at them.
- Eco-Friendly and Sustainable: By choosing a container pool, you are upcycling a massive steel structure that might otherwise go to waste. They also typically have a smaller footprint and require less water and chemicals than a massive traditional in-ground pool.
- Quality You Can Feel: At svoltex, we use premium-grade, thick PVC liners that are specifically engineered to be tough. They offer excellent UV resistance to prevent fading, are fully compatible with saltwater chlorination systems, and even have antibacterial properties to help keep your pool water cleaner for longer.
- Plug-and-Play Installation: Unlike traditional pools that can take months to build, a container swimming pool arrives at your home fully assembled and ready to be placed, connected, and filled.
- Custom Designs for Any Space: Whether you’re in sunny Sydney or rainy Seattle, our custom designs can be tailored to fit your backyard and aesthetic perfectly.
Frequently Asked Questions About Container Swimming Pools
How long does a container swimming pool last?
With proper care, the Corten steel structure can last for decades. The high-quality PVC liner typically has a lifespan of 10-15 years before it may need to be replaced, which is a simple and cost-effective process.
Can you heat a container swimming pool?
Absolutely! They can be easily fitted with electric heat pumps or gas heaters, allowing you to extend your swimming season well into the cooler months or enjoy a warm dip on a cool evening.
How much does a shipping container pool cost?
While prices vary based on size and custom features, they are generally more affordable than traditional in-ground concrete or fiberglass pools, especially when you factor in the speed and ease of installation.
Do container pools need a special foundation?
Yes, they need a solid, level foundation to rest on. This is typically a reinforced concrete slab or concrete footings. A level base is critical to ensure the pool’s structural integrity and proper water circulation.
Are they safe for kids?
Yes, they are very safe. The key is to follow all local safety regulations, especially regarding fencing and self-latching gates, to create a secure environment for your family.
Your Backyard Oasis Awaits
Your container swimming pool is an investment in countless memories—of sunny afternoons, family laughter, and quiet moments of relaxation. By following these steps for preparation, filling, and maintenance, you’re not just maintaining a pool; you’re caring for your personal retreat. The process is straightforward, the routine is simple, and the reward is a crystal-clear, inviting oasis, ready for you to enjoy all year long.
Ready to take the plunge? Contact the svoltex team today to get a personalized quote and start designing the container swimming pool of your dreams!